Joelen of Joelen's Culinary Adventures is amazing. I know that word is thrown around a lot on the interwebs but this case it is totally deserved. Her site is a one stop source for dinner party inspiration and recipes to match. So make sure to check our her site. Every recipe I have found on her site and then tried has been better than expected.
Even better, it is a source for inspiration.
Take this recipe for Pesto Pinwheels. I loved the idea but didn't have the exact ingredients in my pantry as it was written, so I adapted it a bit for our purposes. The result: Yum!!
I will often make these to serve with dinner instead of a roll or a slice of bread.
Pesto Pinwheels
(Source: Pillsbury by way of Joelen's Culinary Adventures)
Ingredients
1 cup prepared pesto
1 tube package of crescent rolls
4 teaspoons grated Parmesan cheese
Directions
Preheat oven to 350.
Line your baking sheet with parchment. If you don't have parchment, an nonstick baking sheet will do.
Remove the crescent roll dough from the packaging and unroll. Separate the dough into 4 rectangles (made up of 2 perforated triangles). Press the dough on the perforated edges to seal.
On each rectangle of dough, spread 1/4 of your prepared pesto and sprinkle with a teaspoon of the grated Parmesan cheese.
Taking the short side of the rectangle, roll the dough to create a log.
Once all 4 logs are rolled, place in the refrigerator for 10-15 minutes to harden slightly. This will make the cutting easier.
Cut the log into 1/2" slices and place on the prepared baking sheet.
Repeat with the remaining rectangles of dough.
Bake in the preheated oven for 10 minutes, rotating your pan after 5 minutes for even baking.
Remove from oven and allow to cool slightly before serving warm.
Friday, March 13, 2009
Easy Pesto Pinwheels
Monday, March 9, 2009
Blake Bakes Giveaway - Cherrybrook Kitchen
 Many many many moons ago (back in October), Blake Bakes had a give away for a box of Cherrybrook Kitchen's cake mix and frosting. I was one of the lucky ones to sign up to receive what turned out to be a tasty tasty treat.
I used the mix and frosting to make a couple of things: cupcakes and petite fours. We served them as dessert at a lunch we hosted at out house. I thought that this would be a great opportunity to get opinions from others on the taste.
 In terms of putting things together, it was easy peasy. The frosting needed to be warmed a bit in the microwave to make spreading easier but once that was accomplished, it went on so smoothly.
When the votes were tallied, everyone gave Cherrybrook Kitchen a HUGE thumbs up. No one could believe that this was nut free, egg free and dairy free. The cake was so moist and the frosting is so chocolaty.
I can say that if I run across this brand again, or if I need to make cupcakes for school or any other event where nuts are a concern.
Hmmm, writing this post makes me think that I need to get baking again.
Monday, February 16, 2009
Vanilla Lime Bites - A New Favorite
 These cookies were by far the favorite cookie I brought for Christmas with my In-Laws. Mr. Gooch couldn't keep his mitts off of them even before the party.
These are melt-in-your-mouth tasty. The lime flavor is subtle with a buttery finish.
I found the recipe on Oishii, a great food blog. You should check it out. Since I used the recipe exactly as written, I am linking you right back to the original post.
I can't wait for a reason to make these again.
Lemon Cut Out Cookies
 I am still catching up on all my holiday posts. Bad, I know.
But I didn't want to skip highlighting these Lemon Cut Out Cookies. I found the recipe on the blog Cookies on Friday.
I needed to bring several desserts to my Mother-in-Law's house for Christmas dinner. I thought that the lemon flavor in these cookies would be a welcome change from the usual chocolate, mint and candies usually found in desserts around the holidays. Especially since we were all gathering on the 28th of December.
These cookies were a big hit and I recommend them to anyone looking for a citrus-y cookie.
One note, the dough is a bit dry so can be a bit difficult to roll out. Just be patient and use a well floured rolling pin.
Since I followed the recipe word for word and did not make any changes or substitutions, please click here to view the recipe.
Thursday, February 12, 2009
Spicy Chai Biscotti
 Spicy Chai Biscotti was the final recipe I made during my night of Biscotti Madness. I loved their spicy, gingery taste.
Again, I found the recipe on Joelen's Culinary Adventures. If you haven't checked out her site, please do. She (and her site) are amazing.
To find the spice, look in the spice aisle. I want to save you the time I spent too much time looking in the tea and coffee aisle. Whoops.
Spicy Chai Biscotti
(Source: Joelen's Culinary Adventures)
Ingredients
1 teaspoon baking powder
1/8 teaspoon salt
2 cups all purpose flour
3/4 cup granulated white sugar
3 large eggs
1 1/2 teaspoon pure vanilla extract
1/4 cup Chai spice powder
Directions
Preheat oven to 300 degrees F and line a baking sheet with parchment paper.
In a small bowl lightly beat the eggs and extracts together. Set aside.
In a bowl of your stand mixer (or with a hand mixer) combine the flour, sugar, baking powder, salt and Chai spice powder.
Beat until blended (about 30 seconds).
Gradually add the egg mixture and beat until a dough forms. With floured hands divide dough in half.
On a lightly floured surface roll dough into a log about 10 inches long and 3 inches wide.
Transfer log to the prepared baking sheet and bake for 35-40 minutes, or until firm to the touch. The logs will spread during baking.
Remove from oven and let cool on a wire rack for about 10 minutes.
Transfer log to a cutting board and using a serrated knife, cut log into slices 1/2 inch thick on the diagonal.
Arrange evenly on baking sheet. Bake 10 minutes, turn slices over, and bake another 10 minutes or until firm to the touch.
Remove from oven and let cool.
Coffee Flavored Chocolate Chip Biscotti
 Another biscotti recipe I made during my night of biscotti madness was this recipe, found on Joelen's Culinary Adventures. I thought that the coffee flavoring would be a nice compliment to my usually skinny vanilla latte.
While Joelen's version calls for espresso coffee, I didn't have any on hand so I made a strong cup of instant coffee instead (I used about 3 to 4 times the amount of dried coffee to make it). It worked out quite well and the biscotti has a nice coffee flavor.
Coffee Flavored Chocolate Chip Biscotti
(Source: Joelen's Culinary Adventures)
3 C All Purpose Flour
1 C Granulated Sugar
1/2 tsp Baking Soda
1/2 tsp Baking Powder
1/2 tsp Salt
1/2 tsp Cinnamon
1/2 tsp Ground Cloves
1/2 C plus 1 Tbsp strong Instant Coffee, cooled
1 Tbsp plus 1 tsp Milk
1 Large Egg Yolk
1 tsp Vanilla
3/4 C Semi-Sweet Chocolate Chips
Directions
Blend dry ingredients well. In small bowl whisk together espresso, milk, egg yolk, vanilla; add to dry flour mixture.
Combine until dough is formed (a very dry, thick dough.) Stir in nuts and chocolate chips if desired.
Turn dough onto lightly floured surface. Knead several times and halve it. Roll dough into two (2) logs approximately 12 inches x 2 inches diameter Transfer to non-stick baking sheet and arrange 3 inches apart to allow for spreading. Flatten logs a bit with palms.
Bake 35 minutes at 350 degrees. Score (diagonally) and cool 10 minutes. I find that a serrated bread knife works well to cut the slices. Reduce oven temperature to 300 degrees. Cut logs diagonally into 3/4 inches slices. Bake 5 minutes more on each side. Cool completely. Store in airtight container.
Wednesday, February 11, 2009
Chocolate Chocolate Chip Cranberry Biscotti
 I love biscotti. Love it. I think it has to do with my love of the latte. It is so yummy to dip a biscotti into that afternoon latte. There is nothing better. To that end, I made several types of biscotti one evening.
This version, chocolate cranberry was inspired by this recipe I found on Stephanie Cooks.
They are in a word, amazing. I love the sweetness of the cookie, the slight bitterness of the semi-sweet chips and the tartness of the dried cranberries.
I hope you enjoy them as much as I did.
Chocolate Chocolate Chip Cranberry Biscotti
Ingredients:
2/3 cup (4 ounces) semisweet or dark chocolate chips (or chopped chocolate)
1/2 cup (1 stick/4 ounces) butter
2 eggs
1 cup granulated sugar
1 teaspoon vanilla
2 to 2-1/4 cups all-purpose flour
1/2 cup unsweetened cocoa
1-1/2 teaspoons baking powder
1 teaspoon salt
1/2 cup dried cranberries (I think I may have added a bit more than this)
1/2 cup semi-sweet chocolate chips
Directions:
Heat oven to 350 degrees. Melt the butter and chocolate together and set aside.
Beat the eggs and sugar until lightened.
Add vanilla and chocolate mixture.
Mix in the flour, cocoa, baking powder, and salt just until combined. You should have a soft, but not sticky, dough. Add the extra 1/4 cup of flour if dough is too sticky.
Add cranberries and chips at this point as well.
Divide the dough in half. On a lightly floured surface, form each half into a log that is 3-1/2 inches by 9 inches. Place logs on a large baking sheet and bake for 25 minutes or until tops are set.
Remove the cookies from the oven. While the biscotti are cooling, reduce the oven to 275 degrees. Let logs cool as long as you can (the cooler they are, the easier to cut), and then slice into 1/2-inch thick slices. I have found that using a serrated bread knife works perfectly to cut the logs into the smaller slices.
Arrange the slices on baking sheet and bake for 20 minutes. Remove from oven, carefully turn slices over, and bake for another 20 minutes. Cool on a wire rack.
Store in an airtight container or freeze.
Friday, January 2, 2009
Pudding Fail? - No Worries, Make Frosting
 We had a butterscotch pudding fail when attempting the TWD: Real Butterscotch Pudding. It never set up and so we were left with butterscotch cream. It was the equivalent of 4-6 servings of pudding that didn't "pud". So that is what we ended up calling what was now sitting in several travel mugs in the fridge - Pud.
Mr. Gooch had the great idea of mixing the "pud" into a buttercream frosting and putting it on top of french vanilla cupcakes. I thought that this was a wonderful idea. The only problem, I had never made buttercream frosting before.
I did find this recipe for Magnolia Vanilla Buttercream. It looked like a great starting off point since it involved a larger quantity of liquid than many others I found.
The result was absolutely tasty and we are working our way through a dozen and a half cupcakes and frosting (with a strawberry on top of each one) as we speak. Yum Yum!
Butterscotch Buttercream Frosting
(Adapted from Magnolia Vanilla Buttercream)
1 cup (2 sticks) unsalted butter, softened
6 to 8 cups confectioners’ sugar
3/4 to 1 cup butterscotch "pud" (I kept adding liquid until it had the desired butterscotch-y taste)
Place the butter in a large mixing bowl.
Add 4 cups of the sugar and then the butterscotch "pud".
On the medium speed of an electric mixer, beat until smooth and creamy, about 3-5 minutes.
Gradually add the remaining sugar, 1 cup at a time, beating well after each addition (about 2 minutes), until the icing is thick enough to be of good spreading consistency.
You may not need to add all of the sugar.
If desired, add a few drops of food coloring and mix thoroughly.
Icing can be stored in an airtight container for up to 3 days. (Use and store the icing at room temperature because icing will set if chilled.)
Tuesday, December 2, 2008
Orange Ginger Cranberry Muffins - Tasty Thanksgiving Leftovers
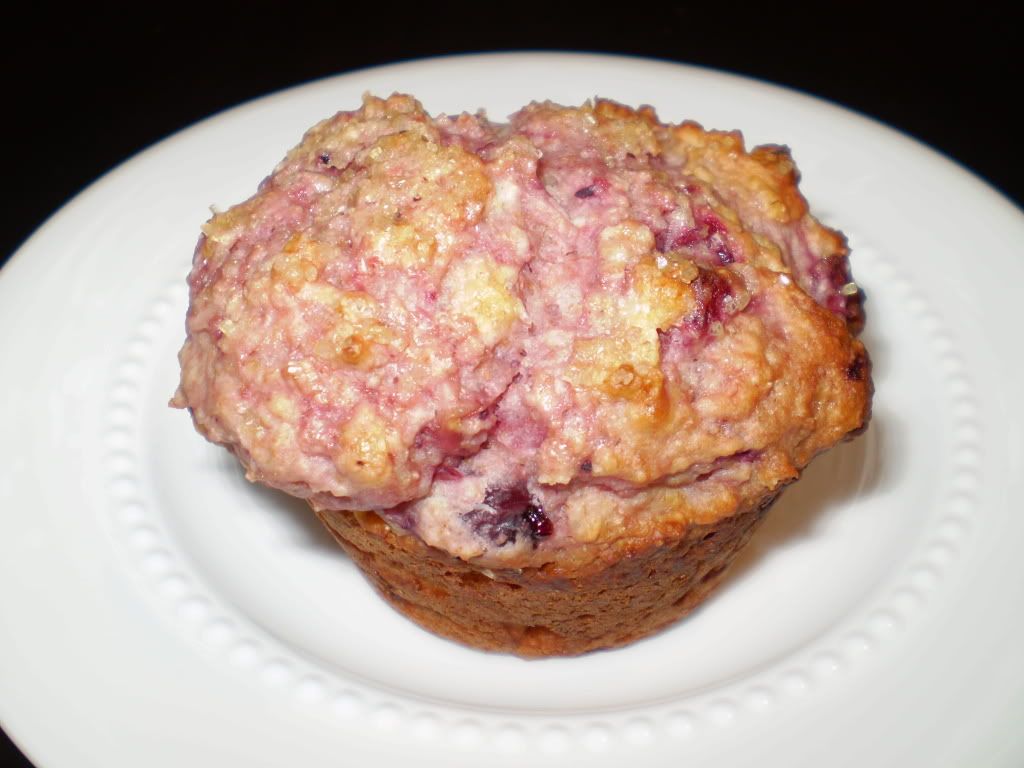 What to do with our leftover cranberry sauce? I was feeling a bit stumped until I saw this post on Joelen's Culinary Adventures for Cranberry Orange Sour Cream Muffins. While I didn't have any sour cream, I knew I could substitute yogurt so I was off to the kitchen to make muffins.
While I wish I had added a bit more of the cranberry sauce and some candied ginger for some additional zip, these are still VERY good muffins.
Mr. Gooch had one for breakfast and declared them delicious. That is good enough for me!!
Orange Ginger Cranberry Yogurt Muffins
Source: Joelen's Culinary Adventures and Sharing a Table Cookbook
Ingredients
1 1/2 cups all purpose flour
1 cup whole wheat flour
1 tablespoon baking powder
1/4 teaspoon salt
1/4 cup sugar
1 egg
1/4 cup canola oil
1 + 1/2 cups low fat plain yogurt
1 cup orange ginger cranberry sauce
Directions
Preheat the oven to 400 degrees. In a medium bowl, sift together the flour, salt, and baking powder and set aside. In another bowl, beat the egg and oil together. Stir in the sour cream.
Make a well in the dry ingredients and mix in the wet ingredients until the batter coheres. The consistency should be closer to that of biscuit dough than batter. Be careful not to over mix.
Fold in any additional ingredients gently. Spook into muffin tins that have been sprayed well with vegetable oil. Bake 20 to 25 minutes or until golden brown.
Wednesday, November 26, 2008
A Taste of the Season - White Chocolate Cranberry Oatmeal Cookies
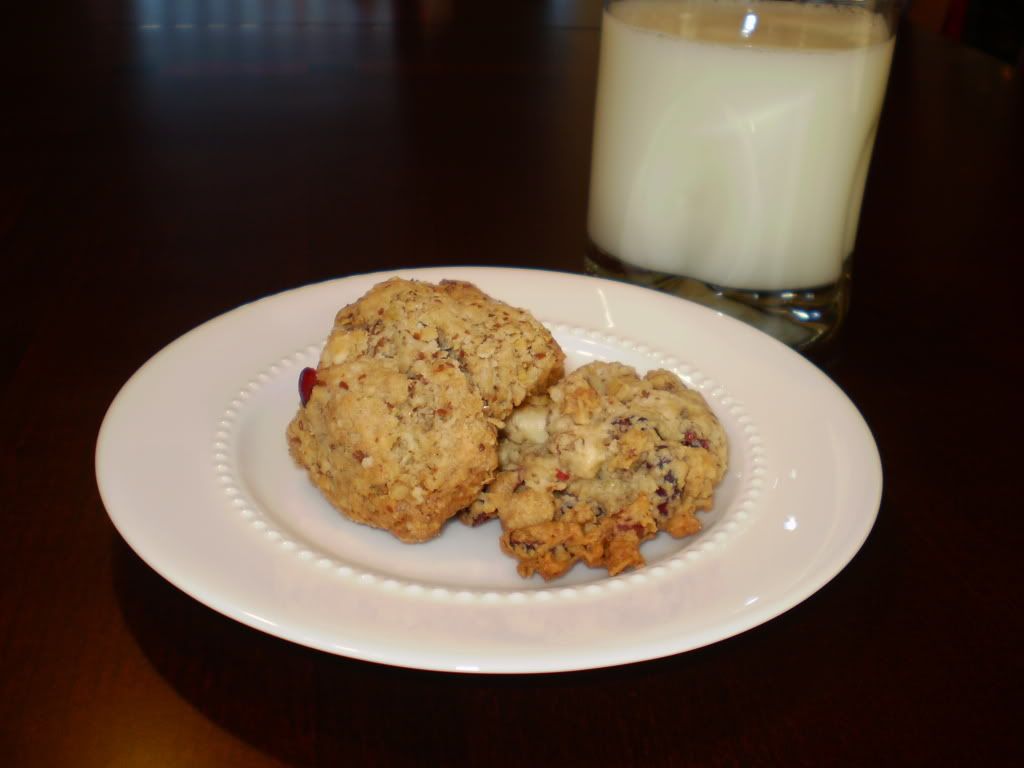 I am so glad that the pumpkin season is almost over. That means it is time for the cranberry to shine in baking and cooking. And to start off the cranberry season, I made some of the tastiest white chocolate cranberry oatmeal cookies ever.
Using a recipe found on Fresh from Cate's Kitchen (click here to view Cate's blog), these cookies barely lasted 56 hours in our house.
If you are looking for an easy and incredibly tasting cookie, this is the one for you.
White Chocolate Cranberry Oatmeal Cookies
Ingredients
1/3 cup sugar
1/3 cup packed brown sugar
1/2 cup butter, softened
1 large egg
1 teaspoon vanilla extract
1/2 teaspoon cinnamon (I used freshly grated nutmeg instead)
1/2 teaspoon baking soda
1/4 teaspoon salt
1 cup all-purpose flour
1 1/2 cups quick-cooking oats (not instant)
3/4 cup dried cranberries
6 ounces white chocolate chips
Directions
Preheat oven to 350 and line two baking sheets with silpats or parchment paper.
In a small bowl, whisk together flour, cinnamon, baking soda, and salt.
In the bowl of a stand mixer, cream the butter with the sugars until fluffy.
Add egg and vanilla and mix well.
Stir in oats, flour mixture, white chocolate, and cranberries and mix until combined.
Drop by heaping tablespoonfuls onto cookie sheets and bake for about 10 minutes, until just beginning to get a little color.
Tuesday, October 28, 2008
TWD: Chocolate-Chocolate Brownies
This week's Tuesdays with Dorie*** recipe was Chocolate-Chocolate Cupcakes (page 215-217 in the fabulously delicious cookbook "Baking: From My Home to Yours") was selected by Clara of I Heart Food4Thought.
When I saw the title of this recipe I was thrilled. I LOVE chocolate. My husband can tell you that it could be considered my downfall. This recipe had it all: cocoa powder, melted chocolate, chocolate ganache frosting. My mouth watered just looking at the picture in the book.
I was so pleased with my results. What I mean is, I was thrilled with results of the cupcake photo shoot. It shows the shininess of the frosting and makes the cupcake look so tempting. The cake stand that has been in my husband's family for years event looks great.
The reality of the cupcake taste was less thrilling. They were dry. I had seen some of the comments on the Tuesdays with Dorie blog and so made sure to thoroughly cream the butter and watched the time in the oven. Neither of these things seemed to help. This was the first of the TWD recipes that I wasn't thrilled with. But that is what make this group so nice, I know that next week we will move onto something totally new.
Please note: the dryness didn't stop my husband and I from eating them all. We managed to polish them off in just two days.
***If you are interested in joining Tuesdays with Dorie, DO SO QUICKLY. No new members will be accepted after October 31.***
Tuesday, October 14, 2008
TWD: Lenox Almond Biscotti
This week for Tuesdays with Dorie, Gretchen of Canela & Comino chose Lenox Almond Biscotti. A great (and totally) tasty pick.
When I told Mr. Gooch that I was planning on making this recipe, he thought I said Lemon Almond Biscotti. At that point he said it sounded frou frou and if I was going to "man it up" by adding some ground glass or broken nails. He thinks that biscotti is slightly girly.
However, this recipe changed his mind. My new nickname is "Hotti Biscotti" because of it . So thank you Gretchen and Dorie.
Back to the recipe review. This was an easy recipe to follow.
I do wonder what these would taste like if you toasted the almonds first before adding to the dough? I think it would add a stronger nutty taste that would compliment the cranberries. Guess I will have to add that to the list of recipe modifications to try.
Visit TWD to see other baker's blogs and learn more about Gretchen and her baking background.
Visit TWD to see other baker's blogs and learn more about Gretchen and her baking background.
Monday, October 13, 2008
Dinner Rolls - How Sweet They Were
When this recipe popped up in my Google Reader, I knew that I had to make it. Sweet Dinner Rolls, posted by Daily Deliciousness, is a great dinner accompaniment. I made them one evening when we were having marinated steak. Their sweetness was a wonderful foil to the saltiness of the marinated meat.
The only change I would make next time would be to cut the sugar amount to 1/4 cup to see if it impacts the sweetness. They were just a bit to sweet for me but Mr. Gooch loved them.
Since it was just Mr. Gooch and I, I separated the pan full of rolls into 3 Ziploc bags and froze 2 for later use.
Sweet Dinner Rolls
Ingredients
1/2 cup water
1/2 cup warm milk
1 egg
1/3 cup butter, softened
1/3 cup white sugar
1 teaspoon salt
3 3/4 cups all-purpose flour
1 (.25 ounce) package active dry yeast
1/4 cup butter, softened (for topping rolls)
Directions
Place water and milk in microwave safe bowl and microwave for 1 minute or until liquids reach (110 degrees F/45 degrees C). Pour liquids into mixer bowl; add sugar and stir to dissolve. Add in yeast and let set for 10-20 minutes to proof (the mixture will be foamy).
Attach the bowl to the mixer and mix on low speed adding the salt, 1/3 cup butter and egg. Once well mixed add in the flour 1/4 cup at a time. Remove the paddle attachment and attach the dough hook. With the mixer; knead the dough for 5-10 minutes or until smooth and elastic.
Remove the dough from the bowl and shape into desired shape. Cover with a clean towel and let rise in a warm place for an hour. (You can place a bowl of very hot tap water in the bottom of your stove and place the rolls on the rack above it *this is what Daily Deliciousness recommended and it worked like a charm!). Gently brush the tops of the rolls with half of the remaining softened butter.
Preheat oven to 400 degrees and bake the rolls for 10-15 minutes or until golden brown. Upon removing the rolls from the oven brush them with remaining softened butter once again.
Apricot Cream Scones - A Total Success
I had previously made blueberry scones and enjoyed them so much, I had to make them again.
After the success of the Rustic Italian Bread from America's Test Kitchen Family Baking Book, I used their recipe for Cream Scones which used a food processor. Holy Shamoly! That appliance made a huge difference. I think it was able to more evenly incorporate the butter.
These scones were lighter, fluffier and puffed up higher than my previous attempt, which was made without the food processor.
Apricot Cream Scones
America’s Test Kitchen Family Baking Cookbook
Ingredients
2 cups (10 ounces) unbleached all-purpose flour
1 tablespoon baking powder
3 tablespoons sugar
1/2 teaspoon salt
5 tablespoons chilled, unsalted butter, cut into small pieces
1/2 cup dried apricots, chopped into small pieces
1 cup heavy cream
Directions
Adjust oven rack to middle position and heat oven to 425 degrees.
Place flour, baking powder, sugar and salt in large bowl or work bowl of food processor fitted with steel blade. Whisk together or pulse six times.
If making by hand, use two knives, a pastry blender or your fingertips and quickly cut in butter until mixture resembles coarse meal, with a few slightly larger butter lumps. Stir in currants. If using food processor,remove cover and distribute butter evenly over dry ingredients. Cover and pulse 12 times, each pulse lasting 1 second. Transfer dough to large bowl.
Stir in heavy cream and apricots with a rubber spatula or fork until dough begins to form, about 30 seconds.
Transfer dough and all dry, floury bits to countertop and knead dough by hand just until it comes together into a rough, sticky ball, 5 to 10 seconds. Form scones by either pressing the dough into an 8-inch cake pan, then turning the dough out onto a lightly floured work surface, cutting the dough into 8 wedges with either a knife or bench scraper.
Place wedges on ungreased baking sheet and bake until scone tops are light brown, 12 to 15 minutes. Cool on wire rack for at least 10 minutes. Serve warm or at room temperature.
Sunday, October 12, 2008
My First Real Loaf of Bread - Italian Rustic Loaf
I now know why the bread maker gets up in the middle of the night to bake the bread. Baking bread is a time intensive process. Good thing I ran all my errands yesterday.
I decided to make bread this weekend after I purchased the American Test Kitchen's Family Baking Book this week at Costco. Baking bread is my weakness so I wanted a clear and easy book to follow to try my hand at baking a loaf of bread.
I decided to make the Rustic Italian Bread. It took two days but tasted amazing with some Kerrygold Irish Butter.
Rustic Italian Bread
Source: America's Test Kitchen Family Baking Book
This recipe requires a bit of patience—the sponge, which gives the bread flavor, must be made 11 to 27 hours before the dough is made. We find it makes the most sense to prepare the sponge (which requires just 5 minutes of hands-on work) the day before you want to bake the bread.
On the second day, remove the sponge from the refrigerator and begin step 2 at least 7 hours before you want to serve the bread. If you own two standing mixer bowls, in step 1 you can refrigerate the sponge in the bowl in which it was made. Use the second bowl to make the dough in step 2. Have ready a spray bottle filled with water for misting the loaves.
Sponge
2 cups (11 ounces) bread flour
1/4 teaspoon instant yeast
1cup water, approximately 110 degrees
Dough
3 cups (16 1/2 ounces) bread flour, plus more for dusting the work surface and hands
1 teaspoon instant yeast
1 1/3 cups water, approximately 110 degrees
2 teaspoons salt
1. For the sponge: Combine the flour, yeast, and water in the bowl of a standing mixer fitted with the dough hook. Knead at the lowest speed until the ingredients form a shaggy dough, 2 to 3 minutes. Transfer the sponge to a medium bowl, cover tightly with plastic wrap, and let stand at room temperature until it has risen and fallen. Let sit at room temperature for at least 6 hours or up to 24 hours.
2. For the dough: Remove the sponge from the refrigerator and let stand at room temperature while making the dough. Combine the flour, yeast, and water in the bowl of a standing mixer fitted with the dough hook; knead at the lowest speed until a rough dough is formed, about 2 minutes. Turn the mixer off and, without removing the dough hook or bowl from the mixer, cover the bowl loosely with plastic wrap; let the dough rest 20 minutes.
3. Remove the plastic wrap, add the sponge and salt to the bowl, and continue to knead at the medium low speed until it is smooth and elastic, about 8 minutes (the dough should clear the sides of the bowl but stick to the bottom). If after 4 minutes more flour is needed, add 2 tablespoons at a time until the dough clears the sides of the bowl but sticks to the bottom.
4. Turn the dough out onto a lightly floured counter, knead by hand to form a large smooth ball, Place the dough to a large lightly oiled bowl (at least 3 times the dough’s size) and cover tightly with plastic wrap. Let the dough rise in a cool, draft-free spot until it has doubled in size, about 1 hour.
5. Remove the plastic wrap and leaving dough in the bowl, slide a plastic bench scraper under one side of the dough, gently lifting and folding one third of the dough toward the center. Repeat with opposite side of the dough, and, finally, fold the dough in half, perpendicular to the first folds (so that it resembles a rough square). Replace the plastic wrap; let the dough rise 30 minutes. Turn the dough again, replace the plastic wrap, and let the dough rise 30 minutes.
6. Top a rimless (or inverted) baking sheet with parchment paper. Turn dough out onto a work surface lightly coated with flour. Gently scrape the dough from the bowl and invert onto the work surface (the side of dough that was against the bowl should now be facing up). Dust the dough and your hands liberally with flour and, using minimal pressure, push the dough into a rough 10-inch square, gently dimpling it with your fingers. Then fold the top left corner diagonally to the middle. Repeat this with the top right corner, and begin to gently roll the dough from top to bottom, continuing to roll until the dough forms a rough log. Roll the dough onto its seam and, sliding your hands under each end, transfer the dough to a sheet of parchment paper. Gently shape the dough into a 16-inch football shape by tucking the bottom edges underneath. Coat the loaf lightly with vegetable oil and cover loosely with plastic wrap; let the loaf rise until doubled in size, about 1 hour.
7. Meanwhile, adjust an oven rack to the lower-middle position, place a baking stone on the rack, and heat the oven to 500 degrees. Let the stone heat for at least 30 minute but no more than 1 hour.
8. To bake: Using a single-edge razor blade or sharp chef’s knife, cut three diagonal slits 1/2 inch deep across the top of the loaf; spray the loaf lightly with water. Slide the parchment sheet with the loaf onto a peel or inverted rimmed baking sheet, then slide the parchment with the loaf onto the hot baking stone in the oven. Bake 10 minutes, then reduce the oven temperature to 400 degrees and quickly rotate the loaf from front to back using the edges of the parchment; continue to bake until deep golden brown and an instant-read thermometer inserted into the center of the loaf reads 210 degrees, about 30 - 35 minutes longer.
9. Transfer to a wire rack, discard the parchment, and cool the loaf to room temperature, about 2 hours.
Apple Crisp to the Rescue
Mr. Gooch and I were invited to dinner at a friend's house Friday. The hitch, their house is almost 2 hours away, we were leaving in about an hour and I was going to bring dessert.
After my initial panic of realizing that the apple tart I wanted to make would not work due to the time constraint, I went right to a great source of help. The What's Cooking board on The Nest. The ladies there recommended several recipes and I ended up making a variation on the apple crisp. I used a recipe I found on Jenn and Food, Perfect Together as the starting point and added 1/2 cup of rolled oats to the crust to add more crunch.
Apple Crisp
Ingredients
4 cups sliced applesground cinnamon
1/2 cup water
1/2 cup white sugar
1/2 cup dark brown sugar
1/2 cup butter
3/4 cup all-purpose flour
1/2 cup rolled oats (do not use quick cook kind)1/2 cup water
1/2 cup white sugar
1/2 cup dark brown sugar
1/2 cup butter
3/4 cup all-purpose flour
Directions
Preheat oven to 350 degrees F (175 degrees C).
Grease an 8x8 inch baking dish.
Place apples in prepared dish.
Sprinkle with cinnamon.
Pour water over all.
In a bowl, cream together sugar and butter. Blend in flour and oats.
Sprinkle mixture evenly over apples.
Bake in preheated oven 50 minutes, until apples are tender and crust is golden.
To prepare for the trip, Mr. Gooch peeled the apples and sprinkled with lemon juice to keep them from browning and then placed them in a gallon bag Ziploc bag. Using my Kitchen Aide mixer, I combined the crust ingredients and placed in a Ziploc quart bag. Both these bags went into a cooler for the trip along with the 8x8 inch glass pan, ground cinnamon and Pam (to grease the pan).
We assembled all the components at our friend's house and baked in the oven.
Served with vanilla ice cream it turned out amazing. With everyone wanting the the recipe, I am counting this one as a total home run.
I have also submitted this to Joelen's Culinary Adventures Cooking Challenge: Cobblers, Crumbles & Crisps, Oh My!
I have also submitted this to Joelen's Culinary Adventures Cooking Challenge: Cobblers, Crumbles & Crisps, Oh My!
Homemade Pizza - I May Never Go Back to Storebought
Inspired by the creation of my homemade pizza sauce and the recent purchase of a pizza stone, I knew that I had to make some pizza dough so Mr. Gooch and I could have a little pizza party.
Hitting the Google Reader, I found a recipe for Drunken Pizza Dough on Lynsey Lou's blog. I liked the idea of using wine in the dough and it turned out to be fabulous tasting. I split the dough to make 4 smaller pizzas. I guess they would be considered personal size.
I made two versions of our personal pizzas. The first was chicken sausage with the tomato sauce, the second was chicken sausage with BBQ sauce. Both were amazingly tasty though the BBQ was my favorite.
I can say for sure this will be made again. I already have the smoked Gouda to be used for next time.
I can say for sure this will be made again. I already have the smoked Gouda to be used for next time.
Personal Pizzas
Ingredients
Pizza Sauce or BBQ SauceDrunken Pizza Dough (click for recipe) - split into 4 balls
Shredded Mozzarella Cheese - I used low fatAndouille Chicken Sausage - thinly sliced
Roll out pizza into desired thickness
Spread saucePlace sliced sausage on sauce
cover with cheesebake for 12-15 minutes or until cheese is bubbly
Monday, September 29, 2008
Blueberry Muffins and Strawberry Minibreads
The last two items included in the September Baking Extravaganza gift bags for Mr. Gooch's mother and grandmother were blueberry muffins and strawberry mini breads. After realizing that I wasn't going to be able to make my usual favorite version since I didn't have enough plain yogurt in the fridge, I went searching for another version.
I found this recipe from Made With Love. In her version she used raspberries, the recipe called for blueberries so I figured I would be OK also using strawberries. Turns out I was right.
For the muffins, I followed the recipe closely but added more fruit.
For the strawberry mini breads, I substituted strawberries, put the batter into 4 mini-loaf pans and baked until the center tested done with a toothpick, about 30 minutes.
Maxine's Blueberry Muffins
INGREDIENTS:
2 cups AP flour
1 cup sugar
1 Tblsp baking powder
1/2 tsp salt
3/4 cup milk
1/2 cup melted butter (1 stick)
1 beaten eggs
1 cup blueberries (or strawberries)
DIRECTIONS:
Preheat oven to 350 degrees
Mix dry ingredients together in large bowl
Then add milk, melted butter and the beaten eggs.
Mix just until all is incorporated, be sure not overmix!!
Gently stir in the berries.
Pour into lined or sprayed muffin tins, sprinkle tops with coarse pearl sugar
Bake for approximately 20 minutes,or until golden brown and center tests done with a toothpick.
Oatmeal Raisin Cookies - A Husband Pleaser
Mr. Gooch loves the oatmeal raisin cookie. I, on the other hand, am indifferent. They are good, but I would not cross the street to get them.
However, as part of September Baking Madness, I decided to make Mr. Gooch (and his mom and grandma) his favorite cookie.
Not sure which recipe would be best, I went with the recipe developed by the people that make the oats. The Quaker Oats Vanishing Oatmeal Raisin Cookie.
Mr. Gooch declared the cookies "delicious!" That is good enough for me to keep this in the recipe book for the next 50 years.
Vanishing Oatmeal Raisin Cookies
Ingredients
1/2 pound (2 sticks) margarine or butter, softened
1 cup firmly packed brown sugar
1/2 cup granulated sugar
2 eggs
1 teaspoon vanilla
1-1/2 cups all-purpose flour
1 teaspoon baking soda
1 teaspoon ground cinnamon
1/2 teaspoon salt (optional) [I included the salt]
3 cups Quaker® Oats (quick or old fashioned, uncooked) [I used quick oats]
1 cup raisins [I used yellow raisins]
Directions
Heat oven to 350°F.
In large bowl, beat margarine and sugars until creamy.
Add eggs and vanilla; beat well.
Add combined flour, baking soda, cinnamon and salt; mix well.
Add oats and raisins; mix well.
Drop dough by rounded tablespoonfuls onto ungreased cookie sheets.
Bake 10 to 12 minutes or until light golden brown.
Cool 1 minute on cookie sheets; remove to wire rack.
Cool completely. Store tightly covered.
Tollhouse Cookies - Always a Favorite
Anther crowd pleaser in the cookie repertoire is the Tollhouse Cookie. Made even more famous (if that is possible) by the Friends episode where Phoebe is trying to figure out her family's chocolate chip recipe by Neslay Tolloouse. Makes me giggle each time I think about that episode.
Tollhouse Cookies
Ingredients
2 1/4 cups all-purpose flour
1 teaspoon baking soda
1 teaspoon salt
1 cup (2 sticks) butter, softened
3/4 cup granulated sugar
3/4 cup packed brown sugar
1 teaspoon vanilla extract
2 large eggs
2 cups (12-oz. pkg.) Semi-Sweet Chocolate Morsels
Directions
PREHEAT oven to 375° F.
COMBINE flour, baking soda and salt in small bowl.
Beat butter, granulated sugar, brown sugar and vanilla extract in large mixer bowl until creamy.
Add eggs, one at a time, beating well after each addition.
Gradually beat in flour mixture.
Stir in morsels and nuts.
Drop by rounded tablespoon onto ungreased baking sheets.
BAKE for 9 to 11 minutes or until golden brown.
Cool on baking sheets for 2 minutes; remove to wire racks to cool completely
Subscribe to:
Posts (Atom)